
AWS Systems Manager (SSM) allows you to manage your Amazon Web Services resources simply and securely, without the burden of complex infrastructure. In this article, discover how AWS Systems Manager Session Manager enables Cyberwatch to access your cloud assets quickly and securely, without additional deployment, to simplify vulnerability management.
What is AWS Session Manager?
Session Manager is an AWS Systems Manager feature that allows you to open secure sessions on EC2 instances without needing SSH or RDP/WinRM access.
As a result, Session Manager eliminates the need to open SSH or RDP/WinRM ports, enhancing security.
Cyberwatch allows you to configure agentless connections via AWS Session Manager.
Configuration steps on AWS
On the AWS side, you need to configure the EC2 instance to allow Session Manager. Your user must also have the necessary permissions to use Session Manager on your EC2 and execute commands on it.
1. Configuring the EC2
Verify that the SSM agent is installed on your EC2 instance:
The SSM agent is installed by default on certain images provided by AWS or trusted vendors.
If your image does not include it, you will need to install it manually by following the AWS documentation.
To check if it is properly installed on your instance, you can follow the steps provided by AWS.
Create the IAM role for the EC2 instance:
- Go to the AWS IAM console and create a role.
- Select "AWS service" as the trusted entity type, then choose "EC2" as the service or use case.
- In step 2, choose the "AmazonSSMManagedInstanceCore" policy provided by AWS.
- In step 3, name the role (e.g., Cyberwatch-EC2-SSM) and create it.
Attach the IAM role to the EC2 instance:
- Go to the details page of your EC2 instance.
- Under the "Actions → Security → Modify IAM role" tab, select the role you just created.
2. Configuring user permissions
Go to the AWS IAM console and create the following policy in JSON format (under "AWS IAM → Policies → Create policy"):
{
    "Version": "2012-10-17",
    "Statement": [
        {
            "Effect": "Allow",
            "Action": [
                "ssm:DescribeInstanceInformation",
                "ssm:SendCommand",
                "ssm:GetCommandInvocation"
            ],
            "Resource": "*"
        }
    ]
}
This policy allows Cyberwatch to interact with AWS Session Manager to execute commands on your EC2 instances. However, it does not grant access to Session Manager via the AWS interface.
Attach this policy to your user.
Once these steps are complete, you will be able to use AWS Session Manager as a connector to scan your EC2 instances in Cyberwatch.
3. Configuration steps in Cyberwatch
Now that your AWS environment is ready, you need to configure Cyberwatch to use AWS Session Manager as a connector to scan your EC2 instances. Follow these steps:
Enable the AWS Session Manager connector:
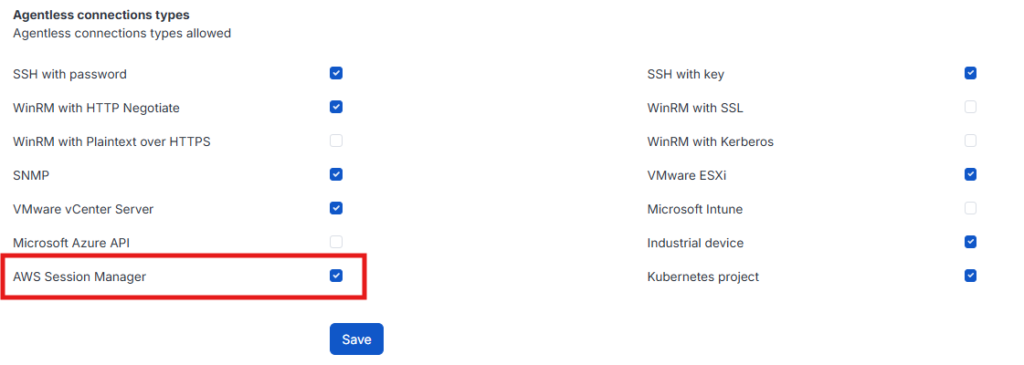
By default, the AWS Session Manager connector is disabled. To enable it, go to "Administration → Connector management" and enable "AWS Session Manager" under "Agentless connection types."
Add your asset:
- Go to "Asset management → Agentless connections."
- Click "Add" to create a new connection.
- Fill in the required fields (name, AWS credentials, etc.).
- Validate the connection and run a scan to test it.
Here is an example:
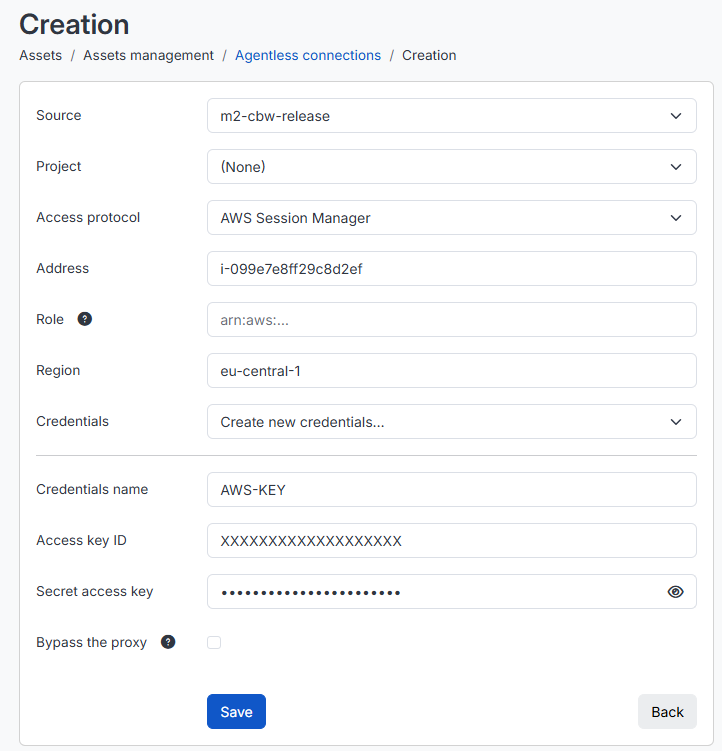
AWS connection keys can be created from the AWS interface by clicking on your account name in the top right corner, then selecting "My Security Credentials."
Once these steps are complete, you will be able to view your scan results and monitor your assets continuously. To take it a step further, consider configuring an "Amazon Web Services" discovery to automatically add multiple assets.